|
BIRGIT'S TRIANGLE FILTER
BACKGROUNDS
This tutorial was inspired by seeing Birgit's
new triangle filter. This tutorial will show you how to make two
background variations and will show you how the background will look when muted
as well.
These backgrounds will work wonderfully in triple or
double background sets or if muted, will work very well alone too.For this
tutorial - you will need the following:
Paint Shop Pro
7 or demo which you can download
here.
Birgit's Chaos
filters which you can download
here.
For this tutorial, you will need the Triangle filter. Be sure to see all
the other beautiful filters available at Birgit's site and download them.
Sandy Blair's Simple Filters that you can
download
here.
For this tutorial, we will be using the Pizza Slice Mirror, Centre Tile,
Diamonds and Zoom Out and Flip filters.
FM
Tile Tools which you can download
here.
For this tutorial, we will be using the Blend Emboss filter.
Step 1
Open a new white image 200 width by 200
height.
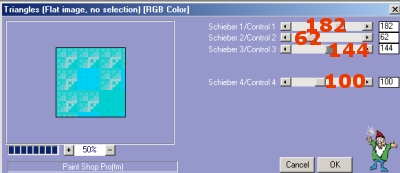
Step 2
Go to Effects/Plug-in Filters/Birgits Chaos and
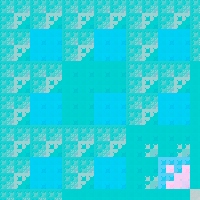
apply the Triangle Filter using these settings:
Your image will now look like this:
Step 3
Now we will colorize this image. To do that,
left click your eye dropper and left click it on any color on the Color Palette
so that it appears on the top color box under Styles at the Styles Palette.
Left click that top color box and this color option window will open up:

Write down the hue and saturation of the color
you chose. For this tutorial, I chose red.
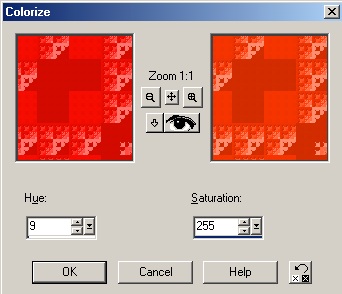
Step 4
Go to Color/Colorize and when the Colorize
window opens up, type in the hue and saturation of the color you want your image
to be. For the shade of red, we will use Hue of 9 and Saturation of 255.
The shade you chose may not be exactly the same but with colorizing, it will be
very close.
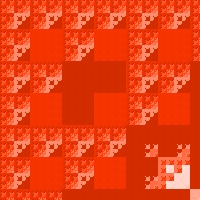
The tile will now look
like this:
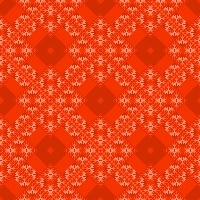
Step 4
Go to Effects/Plug-in Filters/Simple/Pizza Slice
Mirror. Your graphic will
now look like this:

Step 5
Go to Effects/Plug-in
Filters/Simple/Centre Tile and your image should now look like this:

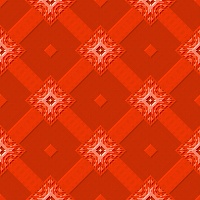
Step 6
Go to Effects/Plug-in
Filters/Simple/Diamonds and you should now have this:

Step 7
Go to Effects/Plug-in
Filters/FM Tile Tools/Blend Emboss and apply the default settings:
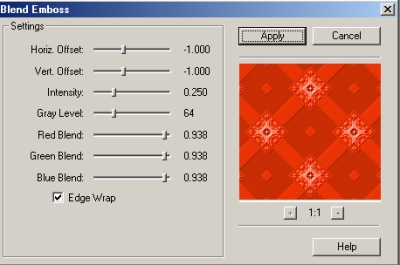
Your completed tile will now
look like this as you see in the outer background. Save you tile as a jpg and be
sure to compress it so that it is less than 30,000 bytes.
To get the tile design in the
Inner Background, you would do this:
Step 1
Do all Steps 1 - 4 as you did
above. Step 4 will get you to the Effects/Plug-in Filters/Simple/Pizza Slice
Mirror. This you will need to do. Your tile should look like this:
Step 2
Go to Effects/Plug-in
Filters/Simple/Zoom Out and Flip and your tile will now look like this:

Step 3
Go to Effects/Plug-in
Filters/Simple/Diamonds and you should now have this:
Step 4
Go to Effects/Plug-in
Filters/FM Tile Tools/Blend Emboss and again use the default settings as you did
above.
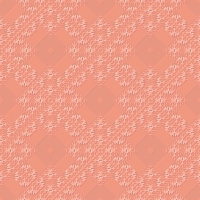
You can save this tile as is
or you can mute it as you see in the middle background of this tutorial. To
mute it, you would do the following:
Step 1
Go to Layers/New Raster Layer.
Step 2
Left click your eyedropper and left click
the tile so that the color of the tile appears in the top color box at the Style
Palette. Left click the color box with your tile color so that the color option window opens up. In
the large color square, left click a much lighter
shade of the color of your tile and click ok. Now flood fill your new
layer with that color. I chose a shade of pink to flood fill my new layer.

Step 3
Move your opacity control on your new layer
over until you see the bottom layer seep into the new flood filled layer. When you have
the look that you like, go to Layers/Merge/Merge All (flatten).
Step 4
Save your file as a jpg and be sure to
optimize it so that it is less than 30,000 bytes.
We hope you enjoyed this tutorial and will
give this a try.
If you
have any questions or comments, please
email us.
Purrs,
Nikki, Nichie,
Gingercats & Sue
INDEX
|